Back in July I noticed a curious plant that I initially thought was a sunflower plant. It had begun to bloom these lovely falls and I would love some help from My Fairy Folks to identify this species. I am surprised with how heafty and healthy this plant is and wouldn't mind adding more to my garden. It has grown so tall, I had my granddaughter pose next to it to show it's full height by propping it up a bit. It's so heavy that I had to tie it to the fence!
Chelsea tries to prop up the plant to show it's full height.
Here is the beginning stage of what will soon be a large, heavy frond.
The weight of the flowers cause the plant to droop.
This photo was taken in the middle of October. I'm very surprised with how long it has stayed lovely and full. It would be a great plant to help block my view of my neighbor's yard.
If you have any guess of what this plant species could be, please leave me a comment on this blog post or send me an email. I'd really appreciate the help of my Fairy community.
Hazel the witch was invited to the fairy community for the Halloween festivities. She positioned herself outside the haunted house and waited for happy trick-or-treaters to come visit.
Hazel patiently waits in front of the haunted house for the horde of children that would gleefully ask for candy. She has a big smile on her face and is happy to have been invited.
Hazel had so much fun (and so did all the children) and hopes to return next year. The children enjoyed dressing up and eating candy.
My Previous Update of the backyard area was last month but I wanted to show you this month's look since it ties in with our most recent class.
Tiered gardens are not only a nice piece as a whole, they also have the ability to be spread throughout an area and become their own individual pieces.
I've expanded the seating area to include a cozy chair and some accent plants.
Photo credit: CertainlyCaroline, YouTube (please visit her page for a tutorial for this polymer clay beauty)
Pictured above is Pumpkin, one of the fairies in our community. Her favorite season is Fall and this week she invited three of her closest friends to a lovely dinner party. She served many Autumn delights but the one which received the most praise was her Pumpkin Soup. I was able to get a picture of the dinner table set up, which I found so interesting - bowls made of acorn tops and soup served in a small pumpkin. It was a lovely event.
This month I'm going to show you how to make a tiered container garden. Tiered gardens allow you to be more creative, not only with a theme, but also with plants. For this particular garden I chose to do a Halloween theme and stuck with succulents as my natural feature. Just like with any other container garden you'll need to start with creating drainage holes on the bottom of each container that will be housing living plants. In order to make the floating tiered illusion, you'll need some small terra cotta pots and saucers.
Plan your design next. In a tiered garden, you'll want to make sure the highest tier is in the back so it doesn't block any other features. Once mental planning is done, you'll need to place the terra cotta pots upside down to begin your tiers. It's important that these pots are stabilized in the bottom of the large container. If your pots are not different heights (important for a tiered effect), an easy fix is to stack two terra cotta pots together, giving it a little more height.
Next, fill the large container with wood chips (not mandatory, just a suggestion to save on the amount of soil used) and potting soil, fixed around the terra cotta pots. Place your saucers in their designated spots so you can make sure the spacing and height works. This is the time to make stress-less alterations.
Once everything looks like it is fitting nicely, it's time to work on your saucers. The great thing about tiered gardens is the mobility; you can take off a level and move it to another area of your garden or replant on an individual level. As always, the theme and layout is up to you, so let your creativity run wild.
Once you have planned out each saucer (drainage, wood chips, soil, decor), you can begin to plant in the large container. The succulents I used were clippings that had a few days to scab over (dry out at the clipped area) which helps a succulent to lay down it's roots. I planted them in areas that would still be visible once the saucers were placed. Afterward, I used moss to cover up any exposed soil.
Once the planting is done, place each tier in it's place and make alterations as needed. I decided that Pumpkin, the fairy seated on a pumpkin, looked better on the top tier surrounded by other gourds. I also placed a few other large potted plants on either side of the large container to add to the atmosphere.
I'm making progress with the backyard area. Since my previous update on this area, the flowers have filled out, the area is covered in wood chips and there is a comfy seating area. There's still more to do, but I just thought I'd share with My Fairy Folks a little update.
(L to R) Ivy, Julip, Simone and Bridget enjoy the beachside campfire of this Ensenada-inspired container garden.
Ensenada is a popular tourist destination, often via cruise line, but this inspired scene for me represents my time in this city with my family in my early 20s. My father was a dirt bike enthusiast and would haul his family and his bike down to Ensenada to race. He would rent two trailers for the week and we'd settle in on top of a cliff near the beach, he and my mother in one trailer which allowed my sister and I to share the second. We would walk down the cliff to get to the beach and practically had the place to ourselves, listening to the waves crashing. I remember strolling through town checking out the little shops, enjoying the authentic food (which my sister refused to eat - my father would joke that it made our trips less expensive) for a lovely family vacation.
I eventually settled down and got married, starting a family of my own, all while my father continued to race well into his 60s. Unfortunately, after a broken arm during a race, his health declined and within a month took his last breath. It's good to know that he was able to do what he loved for so long.
If you have memories of Ensenada, feel free to share them in the comments below.
I was over at my best friend's house this week. She follows my blog and wanted to show me the things that she had repurposed in her yard. Shown above is an old gate that she discovered over at her son's house. He was going to get rid of it but she said "son, put it in the backseat of my car." As you can see, she has turned it into a decorative planter with air plants. Now this is a work of art and also one-of-a-kind so if you see an old gate, here's one way to repurpose it.
Here is BlueBell with her magic wand. She was working her magic in the yard and overheard me discussing with my friend the upcoming wedding. When I mentioned I was worried about my yard not looking its best for the occasion, BlueBell sweetly offered her services so she is currently working with the rest of my Fairy community to come up with beautiful arrangements and suggestions to present to the happy couple.
I love being able to track my progress in all things related to my blog. On Saturday September 17, at 7:20 am, I took the screen shot above so I could share my excitement here. My Google+ has reached 300,000 views (with 525 followers) and I'm so happy. I would like to thank all My Fairy Folks for all your views and shares.
If there is a particular project you'd like to see attempted here on my blog, feel free to comment here or email me.
Last week I shared a project I completed with my granddaughter; fairy chairs. This week, I'd like to share steps for the second project we put together and that is fairy tents. Because of my fairy garden, I have been lucky enough to learn many things about fairies I never knew, including the fact that even fairies "camp." I have seen the young fairies set up tents and camp out together (still close enough to home to be kept watch over) as a way to establish independence. I decided to make some tents that they could use during their next camp out.
SUPPLIES Hot Glue Gun Scissors Craft Sticks/Popsicle Sticks Fake Moss Twigs Silk Leaves (optional) I purchased craft sticks that came in a multi-colored pack which allowed my granddaughter and I to have vibrant tents without messing with paint or markers, but if you'd like an even more personalized look to your tents, feel free to decorate with these things.
1. You'll need to plug in the hot glue gun and let it heat up for a few minutes, so feel free to collect some twigs and other natural items (leaves, grass, dirt) that can help camouflage your tent or give it a natural look. Place about five craft sticks edge to edge and cut some support twigs. Glue the twigs across the craft sticks and allow a few minutes to dry. Do this again for the other side of the tent. Make sure you aren't glueing the twigs all the way to the edge because you'll need to save space to glue the sides together. 2. Once that has dried, flip it over and decorate the outside of the tent with whatever you'd like, however you'd like. Here I chose to glue on some twigs, fake moss and a bit of bark. I even used some potpourri to decorate a different tent (pictured at the end of this post). 3. Once everything is dried, place the tent sides together in a V shape (decorations facing outward). The angle is up to you but I'd suggest you find some small things to lean the sides on so your hands can be free to glue. Glue down the crease of the V, making sure the pieces are touching. Be careful not to over-glue it to prevent gluing your tent to your work surface. TIP: perhaps place some dirt down over your work space so if some glue does seep through the V crease, it will grab some natural looking dirt. 4. After some more drying time, turn the tent over (now it looks like an A) and ... tad-ah! A tent! You can also glue a twig along the peak of the tent if you'd like. I also glued some silk leaves together and used it as a make-shift door. Here are some more pictures, including the other tents made.
I hope you all had a safe and enjoyable Labor Day weekend. My weekend was spent with my youngest granddaughter creating inexpensive decor for my fairy garden which I thought would make a great class for this month. Here is a tutorial on how to create some DIY chairs and tents. Supplies were mostly things already in my yard or leftover from other projects. SUPPLIES Hot glue gun clippers fake moss twigs fake flowers (optional) In the picture to the right, you'll also see a white miniature chair. The purpose of this chair was to have a size guide. If you don't have something like this, I would suggest you bring out a fairy to make sure you are making a chair that can fit the leg length and body width. Time to forage! Look around your yard for some small, straight twigs (hopefully you can find a few fresh ones so they are not brittle). Feel free to also collect some pieces that branch off (like a Y shape) to add some character and dimension. The hot glue gun will take a few minutes to warm up, so feel free to plug it in at this point, making sure to lay down a paper plate or something protective for it to rest on. Next, take your clippers and cut pieces: 1. The area of your fairies butt and two support pieces to go the width of these pieces. 2. The length of the fairies legs. You'll need 4 for the chair legs (making sure the cuts are straight) 3. The height of the chair back, including Y-shaped twigs. The height is up to you but I suggest using thinner twigs so the chair won't tip over, but also tall enough so the fairy won't fall backward. I did not make arms for my chair because, in my experience, fairy wings do not allow a fairy to be sat in a chair with arms. Please be sure not to mix up what pieces are for what part of the chair, especially the legs, unless you're looking forward to a wobbly chair! Line up the pieces for your seat and glue two support pieces across. If you have a young child involved in this process, please remind them that the tip of the glue gun and the glue itself is hot. I'm not sure if it's possible to do a hot glue gun project without burning a digit. While this is drying, start putting the back of the chair together. I suggest gluing the Y-shaped pieces at the bend instead of at the base - I attempted to glue at the base and it didn't want to stay put. You can also add some fake flowers, moss, leaves or anything else decorative.
Bring out the leg pieces and glue them one at a time to the seat (the side with the support pieces), holding them in place a few minutes until dry. Once all the pieces are dry, glue the two together to form the chair, and once that is dry, you can glue moss to the seat. Ta-dah, you're done!
I've finally done it! The plan and promise I made over a year ago to incorporate my worldly travel into my Fairy Garden has finally come to fruition. This is the first installation and represents my time in the Hawaiian Islands. I particularly enjoyed my time in O'ahu, specifically at the Polynesian Cultural Center. If I ever get a chance to return, I'd love to experience their evening luau.
The container was only $5 due to some damage. Damaged containers are a great way to save money on your fairy garden. In the picture above, you can barely notice the damage thanks to plant placement. I made sure to use tropical plants and took a lot of time finding a pineapple plant. Of course, drainage was put in before I began to fill it, as shown in the picture on the right.
This seahorse was a yard decoration my friend had. When I spotted it, I made sure to let her know that if she ever decided to get rid of it, I'd take it off her hands. A year later she remembered my infatuation with it and called me to say she was ready to part with it.
Here is the illusive pineapple plant. I couldn't begin my Hawaii garden without it and I finally found it after a year of searching! I have a friend who has been trying to grow one and is having trouble so I knew I needed to buy one with fruit already on it. These plants get pretty big and the leaves are pretty sharp so you should give it 4 to 6 feet to grow and not crowd other plants.
Take a look at this eyesore. It's not pretty but I'm sure some of you out there also have the same problem. A fence can be the line between your backyard and your neighbor's, preventing pets and items from crossing the divide, but it can't prevent you from seeing what's on the other side. For years I've been wanting to hide what was on the other side of this fence and with the help of my family, was able to put one more layer of visual barrier this past June. As a birthday gift, one son helped me to purchase the lattice fence (a portion is shown here) which was the beginning of this new project.
Both my sons and a few grandsons came over one weekend to help make this a reality. I'm so thankful to have these men in my life. What would have taken me months to complete was finished in less than one afternoon! The view is so much better, blocking out what I don't want to see on the other side of the fence. I also have plans to put in some plants along the fence line that will be 4-6ft tall (to hide that backyard even more).
Completed in the same afternoon, all the greenery and roots were evacuated with a rototiller, leaving a clean slate to work with. The cinderblocks line the area and are filled with potting soil so I can have even distribution of flowers.
I've laid down some cardboard at the suggestion of a few internet sources to cut down on the weeding I'll need to do in the future. This area will allow me to expand Fairy Shores and reintroduce food into my yard. I have yielded fruits and vegetables in my yard before, but it was before the time of this blog. This will be my second time working on a food garden and I am excited to use my experience and expand on it to share with My Fairy Folks.
Soil has been laid on top of the cardboard, wood chips will be laid down next and while I have since made progress, I believe the non-food portion of this garden will be complete around November. I plan to wait until Spring to begin the food garden.
Next month I'll share an update on this expanded Fairy Shores area.
Back in March I discovered some eggs in my garden. I would eye them daily when I was in the garden but once Summer came, I began to forget they were there, but the fairies didn't. The fairy community had come together to keep a watch on them because they knew that these were special eggs. Early on, Brittania (Keeper of the Dragons) took a keen interest in these eggs unbeknownst to me. I did feel like the fairies were acting a little secretive, giggling when I would check on the eggs or ask about their progress. I don't know much about hatching eggs so I assumed they maybe were just entertained by my lack of knowledge. But last month, July 11 to be exact, I discovered that the fairies had been keeping a secret from me. I would like to share this exciting video with you.
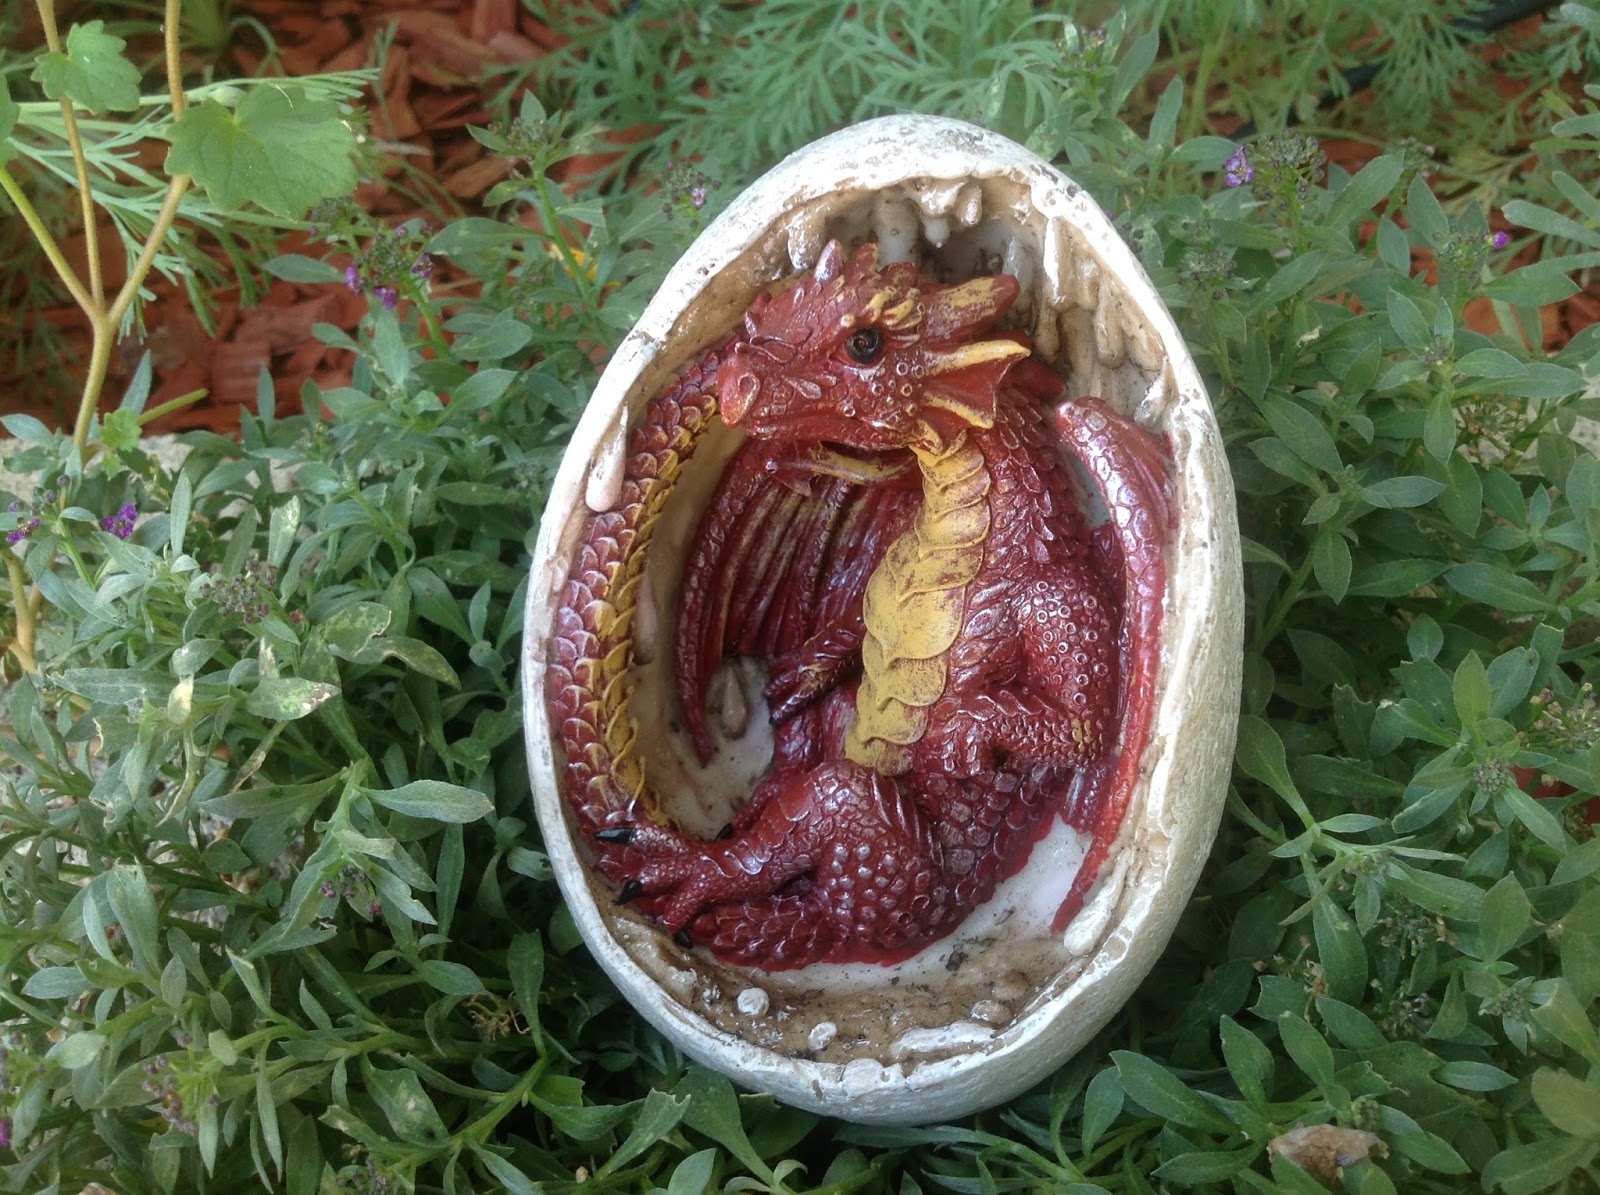
Here are the newborns! The fairies had all gathered round and were very quiet, at the request of Brittania, as these precious babies took their first breath and blinked their eyes in the morning sun. A little later I was able to take individual pictures. I was surprised at how docile they were. I'm so excited for the future of these scaled babies!
This "Black Beauty" is a sweet boy with puppy dog eyes.
This red dragon is the only female of the bunch and is already so photogenic, I can imagine great photo opportunities in the future.
This little guy is noticeably irritated with the amount of pictures I've taken and at the suggestion of Brittania, this was the end of my photo shoot.
As mentioned in the video, these magical beasts haven't been named yet. The fairies will be having a vote on names soon and I suggested we allow My Fairy Folks to put a few names in the hat. So, please leave your name suggestions for the dragons in the comments below.